
Courses
Introduction
1. Courses canmay consist of the following modules:
lesson,Lesson,test,Test,material.Material.
In any quantity and any sequence.
A courseCourse cannot consist of a single test. If it is necessary to publishPublish aone single test,Test, it can be published directly in the test catalog. However,In athis coursecase, Course can consist of one lesson or one material.
2. CourseThe compositionlayout and completionCompletion of the course are sequential. In the settings, moduleyou can specify the conditions for opening conditions can be configuredmodules (see below).
3.
A courseCourse can be part of a program. It will be located in the My Programs section or in the Program Catalog, within the program to which itishasaddedbeento.added.
Course creation and settings
1.
- To
- add a Course, open the Catalog of courses. Click on the plus "Add". The "Add" element is available only to LMS moderators.
MandatoryRequired fields when creating a course:
- Course
name.title. - Course objective.
- Duration.
ThisThe field is mandatory but is automaticallyfilledpopulated when modules are added totheCourse. - Program.
AProgram textdescriptiondescription. - Program of the
program. Program. A text description of the program.Course Program.course. In the form of modules(consisting of tests, lessons,materials).materials.AtIt is necessary to add at least one module (lessonLesson ormaterial) must be addedMaterial) tothe course.Course.
Do not enter special characters in the fields, e.g.,such as a snowboarder emoji.
2. Settings and various nuances.
Image.Image This is thean image that will be displayed onin the course card in the catalog and when opening the course.course is opened.
CatalogSection section.catalog This is a filter for cases when there are many courses in the catalog. SectionsCatalogs are created in the Settings - Application Settings - Sections.Sections section.
Subject.SubjectIn Enterthis post, the Subject of the course subjectis here.introduced. If you put a # is placedsign before a word,word #then it becomes a tag and can serve as an additional filter in the course catalog.
SelectChoose competence. Two options are possible:
- When
selectingCompetenceaiscompetenceselected, to which notlinkedattachedtodevelopmentaldevelopment eventsactivities in thecompetencecompetency module. - When
selectingCompetenceaiscompetencelinkedselected, todevelopmentwhicheventsattached developmental activities in thecompetencecompetency module.
In the first case, thewhen competenceadding servesa competency, it will serve as informational.information. In the second case, the system will generate an Individualindividual Developmentdevelopment Plan (IDP):plan:
- when activating the element "Generate IDP if the passing score is not achieved"
element,, - if the passing score is not achieved in the tests.
Allow comments.Upon When activated,activation, users canwill be able to add comments to the course card.
Issue certificateCertificate.Upon When activated,activation, the system will prompt you to select a certificateCertificate, which is pre-configured in the Settings - Application Settings - Certificates.Certificates section. Upon successful coursecompletion completion,of the course, the system will automatically generate a certificate,Certificate, and it will be available in the My certificatesCertificates section.
Feedback FormUpon (FF).activation, Whenafter activated,completing the course, a feedback formquestionnaire will appearbe after course completion.displayed. The FFfeedback questionnaire (FQ) can be configured in the Settings - Application Settings - FF.FQ section.
Points.PointsIn Thisthis referscase, toit is not a pass-through Score, but a Score within the gamification points, not the passing score.system.
By default,Default for Completion course, points are awarded as set in the application’sgeneral generalapplication settings (Settings - Application Settings - Points) are awarded for course completion.. If nonothing points areis set in the general orsettings course-and this specific settings,setting, no points will be awarded. ActivatingIf this element enablesis activated, the course will have individual point allocation for the course.accrual.
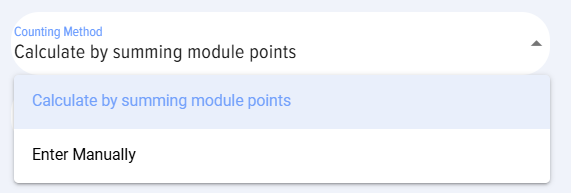
When activated, the following options appear:
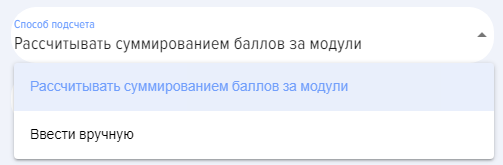
- Calculate by summing
upthemodulepointsscores.for modules. The application will calculate each module (lessonLesson andtest)Test) anddisplayoutput the totalcourseScorescore.for Course. - Enter manually - the number of
scorespoints forthe courseCourse is entered manually.
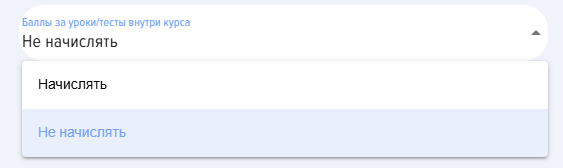
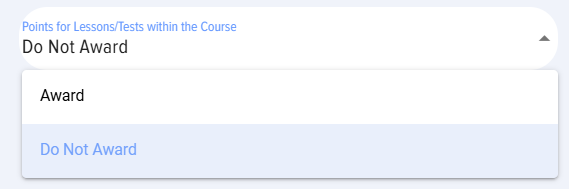
Award scorespoints for modules:
Award.To accrue. That is,scorespoints will beawardedaccrued forthe courseCourse and separately for each module.- Do not
award.accrue.ScoresPoints will only beawarded onlyaccrued forthe course.Course.
Hide in catalogthe catalog.. When Course is activated, the courseit will be hidden in the catalog from users and cannot be self-assigned. The courseCourse will be available for assignment by a moderator. When assigned, the courseCourse will appearbe displayed in the employee's personal account in the My coursesCourses section.
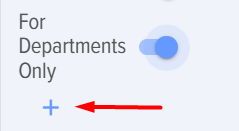
OnlyFor forinternal departmentsuse only. .When WhenCourse is activated, the Courseit will only be available onlyaccessible to employees from the selected departments. Activate and select a department from the structure.

OpeningAccess to modules opening.
- Sequence opening of modules in the course. By Default uses the variant where access to modules.all
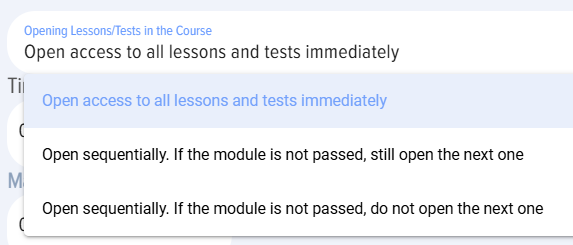
- sequence of module openinglessons/tests/materials in the Course. By Default, the option where all Lessons/Tests/Materials in the Course are immediately accessiblecourse is used.opened immediately.
There are two additional options for sequential module opening:
OptionAwherevariant in which, regardless of the successful completion of the module, the next moduleopensisregardless of the previous module's completion status.unlocked.OptionThe option where the next module opens onlyifupon successful completion of the previousmodule is successfully passed.module.
Time to completeon the Completion course. The time to completeon the CourseCompletion course is specified in minutes.
Maximum number of attempts. The maximum number of attempts to complete the course is specified. By default, itDefault is set to 0 - the number of Attemptsattempts is unlimited. If the attempts are exhausted, then when trying to complete Course, a message will be displayed statingindicating that the maximum number of attempts has been used. An attemptAttempt starts when the startStart button is clicked.pressed.
Availability period.Period. WhenUpon activated,activation, the deadline for course availability is specified. If theAvailability availabilityPeriod periodhave hasexpired, ended,then when attempting to take Course, a message will be displayed stating that the vourseCourse does not fall within theAvailability availability period.Period.
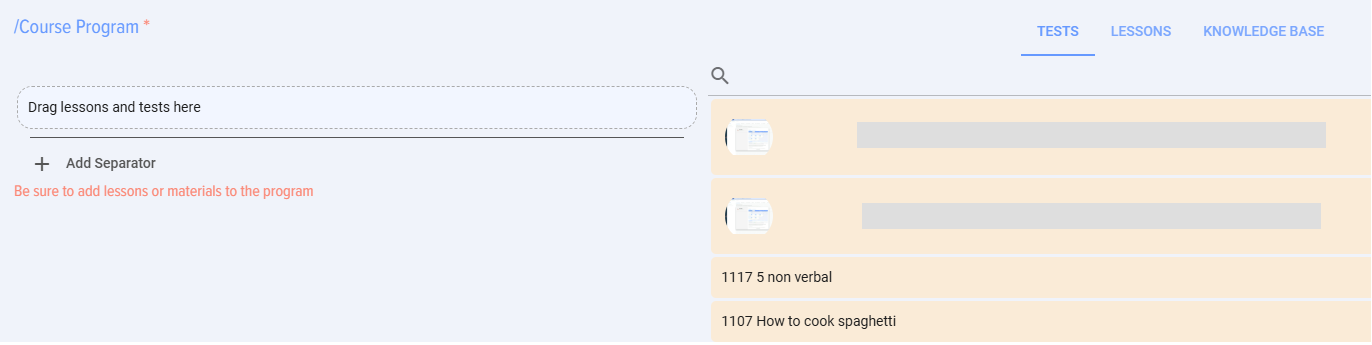
CourseProgram programcourse. . To create the course itself,directly, you need to drag modules from the sections tests, lessons, or knowledge base sections.base. Find the desired one, grab it with the mouse, and drag it tointo the "Drag lessons and tests here" field. That is, the logic is as follows:
- First, lessons, tests, or materials are created and published.
AfterOnce they are published, they will appear in the lists on the right. Then, the course is createdThen from the created and published lessons, materials,tests.and tests, the Course is formed.
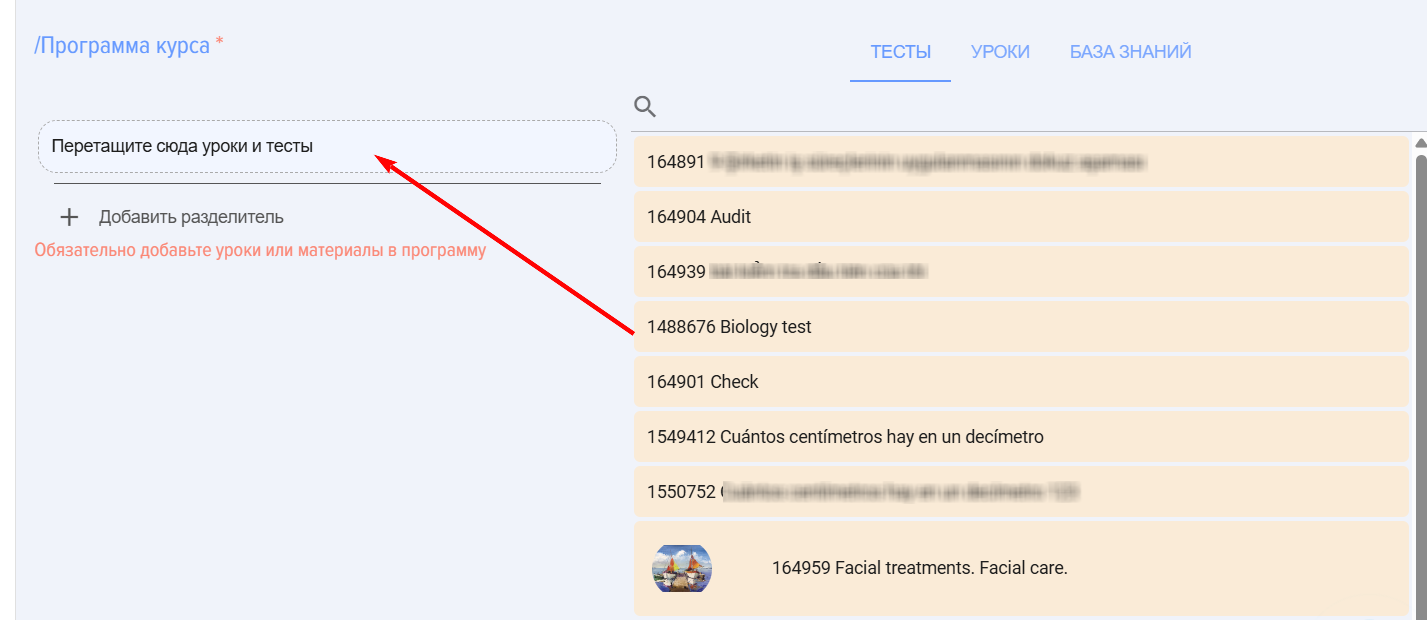
IMPORTANT! ThePublished lessons, tests, and materials are displayed in the lists of lessons, tests, and materialsmaterials. display published lessons, tests, and materials from the same section aswhich is set for the course.
IMPORTANT! If therethe arecatalog contains many lessons/tests/materials in the catalog,materials, start typing the name in the search bar. The application will find the required module and leave only it in the list, then it can be moved to the field tofor program formation.


Course representation: linear, as a tree
1. Course in the application can be represented as linear in the form of or in the program.form of trees.
2. Linear representation of the course.
- Course constructor. Assemble Course by dragging and dropping lessons and tests.
How to assemble Course:
- Find the required Lesson, Test. Use the search in the corresponding columns (in lessons, tests, materials).
- Hover the mouse cursor over Lesson/Test/Material. Press the left mouse button.
- Drag and drop into the "Program course" column and release. Ensure that Lesson/Test ends up in the "Program course" column.
- Thus, drag and drop the required number of lessons, tests, materials, and arrange them in the necessary order.
To change the color of the module card, click on the element
To add a separator between modules (e.g., thematic blocks), click on the element
To change the module name, click on the element  Enter a new name
 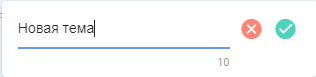 Save.
Save.
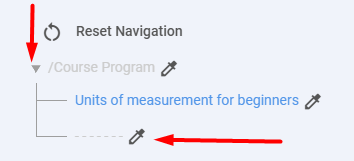
3. Course representation as a tree.
3.2. Stand on the "Program course"
A window for course program formation will appear.
- Drag lessons/tests/materials into the "Program course" zone, the "Drag lessons and tests here" field, and release. Ensure that Lesson/Test ended up in the "Program course" column.
- Thus, drag and drop the required number of lessons and tests, and arrange them in the necessary order.
3.3. SeparatorIf it is necessary to create a sublevel, create a separator and add modules to it as well.
Click on Add Separator
Open the course program and click on the added separator.
Edit the Separator Title
Then stand on the divider (similar to the Course Program) and add modules.
Course in linear form appears as follows:
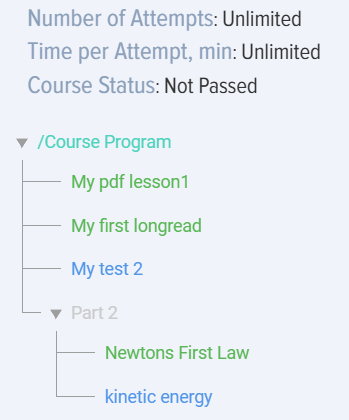
Course appears as a tree as follows:
Course Actions
Course can be edited, deleted, copied, imported, exported:
- Course is copied entirely. The word "_Copy" is added to the name. The copied Course is added to Catalog in the Draft status.
- Course can be exported and imported in Excel or Udata format. Choice export/import format is set in the Settings-Other-Export Format section.
- When Course is deleted, it is permanently removed and cannot be restored.
Completion course
Features of course completion:
- With each new course start, the system records a new one. attemptThe number of course attempts may be unlimited (if Restriction is not set). When generating reports, all attempts can be hidden.
- To obtain the status for a lesson/material Passed It is absolutely necessary to press the button. Complete the module in the lesson or Acknowledged in the material. If you do not press the corresponding element, but close or proceed to the next module, then Status will remain Not Passed.
- After completion of all modules with status Passed Course receives Status Passed automatically.
- If Course is part of the program, it must be searched for in the programs.
- If Course is assigned, it is located in the My Courses/Assigned section. After starting its completion, it will move to Section Completed or In Progress.
Course presentation: linear, as a tree
-
The Course in the application can be presented in a linear form or as a tree.
2. Linear course presentation.
How to assemble the сourse:
- Find the required lesson, test. Use the search in the respective columns (lessons, tests, materials).
- Hover the mouse cursor over the lesson/test/material. Press the left mouse button.
- Drag it to the "course program" zone (column) and release. Ensure the lesson/test is placed in the "course program" column.
- Repeat to drag the required number of lessons, tests, materials and arrange them in the desired order.
To change the module card color, click on the element 
To add a separator between modules (e.g., subject blocks), click on the element
To rename a module, click on the element
 and save.
3. Course presentation as a tree.
3.1. Activate the tree view 

A window for forming the course program will appea.
- Drag lessons/tests/materials to the "course program" zone, the "Drag lessons and tests here" field, and release. Ensure the lesson/test is placed in the "Course Program" column.
- Repeat to drag the required number of Lessons, Tests and arrange them in the desired order.
3.3. Separator. If a sublevel needs to be created, add a Separator and place modules within it.
Click add separator

Open the course program and click on the added separator
Edit the separator name

The Course in linear view looks as follows:

The Course in tree navigation looks as follows:
Actions with courses
A Course can be edited, deleted, copied, imported, exported:
- The course is copied entirely. The word "_Copy" is added to the name. The copied course is added to the catalog with the Draft status.
- A course can be exported and imported in Excel or Udata format. The choice of export/import format is made in the Settings-Other-Export Format Section.
- When deleted, the course is removed permanently and cannot be restored.
Course completion
Features of the courses:
- With each new start of the course, the system records a new attempt. There can be an unlimited number of attempts to complete the course (if no restriction is set). When generating reports, all attempts can be hidden.
- To obtain the Passed status for a Lesson/Material, it is mandatory to click the Complete module button in the lesson or acknowledged in the material. If the corresponding element is not clicked, but closed or moved to the next module, the status will remain Not Passed.
- After completing all modules with the Passed status, the course automatically receives the Passed status.
- If the course is part of a program, it must be searched for in programs.
- If the course is assigned, it is located in the My courses/Assignedsection. After starting its completion, it will move to the Completed or In Progress section.
Course Statuses
The
Coursescourses have the following statuses:
PublicationStatusStatus:publications:PublishedDraftdraft (saved without publishing)
CompletionPassingStatus:statuses:Not
Started–Started. The Start buttonhasin the course is notbeen clicked.In
Progress–Progress. TheStartstart buttonhasisbeenpressedclicked,in the course, but not all modules are completed.- Passed.
CompletedPassed–-Allall modules are completed. Testshaveare in the statusPassed"Passed" (successfully),andall lessons/materialshavearebeen marked as completedviewed (Finishthe Complete or Acknowledged buttonorisAcknowledgedpressed).clicked).If the
thenFinishComplete Module button ina lesson has not been clicked,the lesson is notconsideredpressed,completed.Lesson - Not
then Material Not Passed.IfPassed, if the Acknowledged element ina material has not been clicked,the material is notconsideredpressed,completed. - Not Passed. Indicates that one of the modules Not Passed: Test, Lesson (the Complete button is not pressed), Material (the Acknowledged element is not pressed).
- Assignment Statuses:
- Self-Enrollment - the employee clicked on Pass Learning,
- appointed - appointed as the application moderator.
Frequently Asked Questions
Question: Is it possible to create Course without testing?
Answer:
Yes, it is possible. A course can have any combination of lessons, materials, and tests. Course cannot consist of only one test. Course can consist of one lesson or one material.
Question: Is it possible to create a Course with only one test?
Answer:
No. Test can be published directly in the test catalog.
Question: Is it possible to grant access to the course to specific employees rather than the entire department?
Answer:
The following options are possible:
1. Hide Course in the catalog and assign it to specific employees. Only these employees will see it in their personal account in the My Courses section.
2. For Bitrix24. Create a group in Bitrix with these employees. Then link Course to the Bitrix group via the Section "Groups" application.
Question: Why can't I Publish Course?
Answer:
To Publish Course, it is necessary:
-
Specify the course name (this is a required field).
-
Add at least one Lesson or Material.
⚠️ Note:
-
If special characters or emojis (such as the skateboard emoji 🛹) are used in the title or other fields, the system may not save Course or allow its Publish.
Question: What is the difference between Course and the program?
Answer:
| Course | Program | |
| Possible modules | Lesson, Test, Material | Lesson, Test, Material, Course, Event |
| Sequence passage | Sequential Completion per one module | Sequential and parallel Completion. It is possible to create stages, levels for sequential completion of modules. |
Question: Where can I view the course completion results?
Answer:
In the application, 4 roles can view course completion results:
- The moderator can view the results in the reports.
- An employee who has completed Learning can view the results in their personal account under the My Courses section by expanding the corresponding Course, if such an option was provided during the course creation.
- The supervisor of the trainee and the moderator with limited rights. In the left menu, the Reports tab. Build the corresponding reports.
Question: Course Finished, but the report shows that Course Not CompletedPassed.
Answer:
Check –if Atall modules with the status "Passed" have been completed. Update the application in the Feed or via the Browser.
If all modules are in the passed status, but Course is still in the "Not Passed" status, please contact support.
Question: How to hide Course from users?
Answer:
All courses upon publication By Default are available to everyone for self-enrollment in the course catalog. Self-Assignment means that an employee opens Course and completes it without being assigned by a moderator.
Each Course can be restricted in availability:
- By adding it to the group (for Bitrix24 and if the functionality is available), Course will only be available to group members.
- Through the settings during creation:
- Hide completely from everyone - hide in the directory,
- make available to specific departments,
- Hide from extranet - for Bitrix 24.
If Course is hidden via settings and assigned, those to whom it is assigned will see it through their Personal Account. All others will still not see it.
Question: Is it possible to grant access to a course/test to specific employees, rather than the entire department?
Answer:
Currently, it is not available, only to the department. This option is under development, and in the near future, it will be possible to grant access to a course or test to specific employees. To do this, when creating a course, it will be necessary to specify the employees who will be granted access to the course/test.
Question: Why does the Status of the course not change when an employee completes it?
Answer:
The courses have the following statuses:
- Status publications:
- published;
- draft (saved without publishing).
- Passing statuses:
- Not Started. The Start button in the course is not pressed.
- In Progress. The start button is pressed in the course, but not all modules are completed.
- Passed. Passed - all modules are completed. Tests are in the status "Passed" (successfully), all lessons/materials are viewed (the Complete or Acknowledged button is pressed). If the Complete Module button in the lesson is not pressed, then Lesson Not Passed, if the Acknowledged element in the material is not pressed, then Material Not Passed.
- Not Passed. Indicates that one of the modules Not Passed: Test, Lesson (the Complete button is not pressed), Material (the Acknowledged element is not pressed).
- Assignment Statuses:
- Self-Enrollment - the employee clicked on Pass Learning,
- appointed - appointed as the application moderator.
If Status of the course Not Started or In Progress, it means that one of the modules within the course Not Passed:
- Not Passed Test;
- Not Passed Lesson (Finish Module button pressed in the lesson);
- Not Passed Material (the element "Acknowledged" in the material is pressed).
After successful completion of all modules Status the course automatically changes to Passed.
Question: Why can't employees see Catalog courses, Catalog tests, the knowledge base?
Answer:
If employees do not see Catalog courses or Catalog tests or the knowledge base, while the moderator can see them, this means that the corresponding Catalog is hidden from employees in the settings.
Catalogs are hidden in the section: Settings (gear icon in the top right) - Application Settings - More - Other tab.
Question: How is Course created and what can it consist of?
Answer:
Course in the Brusnika.LMS system can consist of lessons, tests, and materials in any quantity and sequence. When creating a course, the name, objective, duration (filled in automatically), textual description of the program are specified, and at least one module (Lesson or Material) is added. Course cannot consist of only one test; in this case, Test is published directly in the test catalog. Modules for the course are selected from published lessons, tests, and materials by dragging and dropping.
Answer: What are the main settings available when creating a course?
Answer:
When creating a course, numerous settings are available:
- Image: Image for the course card.
- Section catalog and Subject: For filtering courses. Subject can be marked as a tag using the "#" symbol.
- Competencies: Can form an individual development plan if developmental activities are linked to the competency and the user has not
completed:achieved the passing Score in the tests. - Comments and certificates: Allows users to leave comments and issues Certificate after successful completion.
- Feedback Form (FF): Displayed after completing the course.
- Points: Individual scoring for Course can be calculated by summing up module scores or entered manually.
- Concealment in the catalog: Course may be hidden from public access but is available upon assignment by a
test,moderator. - Availability by departments: Restriction access to the course for employees of selected departments.
- Access to modules opening: Sequential or simultaneous opening of modules, with the possibility of a
lessoncondition(for successful completion of theFinishprevious module. - Time on Completion and number of attempts: Restriction by time and number of course completions.
- Availability Period: Indication of the deadline by which Course is available.
Answer: What is the difference between linear and tree-like course representation?
Answer:
In the application Brusnika.LMS, Course can be presented in two forms:
- Linear representation: The course modules are arranged sequentially. Course is assembled by dragging and dropping lessons, tests, and materials in a specific order. You can change the color of module cards, add separators for thematic blocks, and edit module names.
- Tree view: Allows creating a more complex structure with sub-levels. After activating this mode, you can drag modules into the "Program course" area and create dividers, inside which you can also add modules, forming a hierarchical structure.
Question: How to get Status "Passed" for the course and its modules?
Answer:
In order for Lesson or Material to receive the Status "Passed", it is mandatory to press the "Complete Module" button not(for clicked),a lesson) or "Acknowledged" (for material). If the user simply closes the module or proceeds to the next one without pressing the corresponding button, the Status will remain "Not Passed". After successfully completing all modules with the status "Passed" (including successful Completion tests), Course automatically receives the Status "Passed". Otherwise, if at least one module Not Passed, Course will have the Status "Not Passed".
Question: What statuses can a materialcourse (have?
The courses have the Acknowledgedfollowing elementstatuses:
- Publication statuses:
- Published: Course is available to users.
- Draft: Course saved, but not
clicked).
AssignmentPassingStatus:statuses:- Not
Started:
The "Start" button in the course was not pressed. - In Progress: Course started, but not all modules have been completed.
- Passed: All modules have been successfully completed (tests, lessons with the "Complete" button pressed, materials with the "Acknowledged" button pressed).
- Not Passed: One or more modules Not Passed.
- Not
- Statuses by purpose:
- Self-
assignmentEnrollment:–The employeeclickedindependentlyStartselectedLearning.Course for completion. AssignedAppointed:–CourseThehascoursebeenwasappointedassigned byas the application moderator.
- Self-
Question: What is the key difference between a course and a program?
Answer:
Course may include lessons, tests, and materials, Completion which are carried out sequentially, module by module.
Program is a more complex entity and can include lessons, tests, materials, other courses, and even events. Completion of a program can be either sequential or parallel, with the possibility of creating stages and levels to structure the learning process. That is, Program can combine several courses and other learning elements.
Question: How can I restrict access to a course to specific employees or departments?
Answer:
The following options are available to restrict access to the course:
- Hide Course in the catalog: Course will not be visible in the general self-registration catalog. It can be assigned to specific employees, and only they will see it in their personal account.
- For units only: When creating a course, you can select specific departments whose employees will have access to Course.
- Using Groups (for Bitrix24): Course can be linked to a specific group in Bitrix24, and it will be accessible only to the members of that group.
It is important to note that currently, it is not possible to grant access to the course to individual employees directly through the course settings, only through Assignment after hiding it in the catalog or through groups (if the functionality is available).
Question: Why does the Status of the course not change to "Passed" after its completion?
Answer:
If Course Finished, but its Status remains "Not Started" or "In Progress", this means that one or more modules within the course did not receive the Status "Passed". To successfully complete each module, the following conditions must be met:
- Test: It must be Passed successful.
- Lesson: It is necessary to press the "Complete module" button.
- Material: It is necessary to click the "Acknowledged" element in the material.
If these actions have not been performed for all modules, the Status of the course will not change to "Passed". In this case, it is recommended to check the statuses of all modules and ensure they are "Completed". If all modules are completed and the Status of the course is still Not Passed, it is recommended to update the application.
Question: When creating a course, program, or searching for a lesson/test, the system does not find it, while Lesson/Test is published.
Answer:
Check if there is a space at the very beginning of the lesson/test name. Verify that the search data is entered correctly.
FAQ on courses
Is it possible to create a course without testing?
Yes, it is possible. A Course can have any combinations of lessons, materials, and tests. A course cannot consist of only one test. A course can consist of one lesson or one material.
Can a course be created with only one test?
No. A test can be immediately published in the test catalog.
Is it possible to provide access to a Course to specific employees, not the entire department?
The following options are possible:
1. Hide the course in the catalog and assign it to specific employees. Only these employees will see it in their personal account in the My courses section.
2. For Bitrix 24. Create a group in Bitrix with these employees. Then link the course to the Bitrix Group through the "Groups" section of the application.
Why can't I publish a course?
To publish a course, all fields marked with an asterisk must be filled out, and at least one lesson or material must be added. Fields marked with an asterisk (required):
-
Course name;
-
Objective;
-
Duration (filled automatically);
-
Program.
If specific symbols or emojis are entered in these fields, the system will not allow publishing the course. For example, a snowboarder emoji.
What is the difference between a course and a program?
| Course | Program | |
| Possible modules | Lesson, test, material | Lesson, test, material, course, event |
| Completion Sequence | Sequential completion one module at a time | Sequential and parallel completion. Stages and levels can be created for sequential module completion |
Where can I view Course completion results?
In the application, 4 roles can view course completion results:
- Moderator can view results in reports.
- The employee who completed the training can view results in their personal account in the My courses section by expanding the corresponding course. If this option was provided when creating the course.
- The learner's manager and moderator with limited rights. In the left menu, the reports tab. Generate the corresponding reports.
The course is finished, but the report shows that the course is not passed.
Check if all modules with the 'Passed' status are completed. Refresh the application in the feed or through the browser.
If all modules are in the Passed status, but the course remains in the 'Not passed' status, contact support.
How to hide a course from users?
All courses upon publication are available to everyone for self-assignment in the course catalog by default. Self-assignment means an employee opens the course and completes it without being assigned by a moderator.
Each course can be restricted in availability:
- By adding it to a group (for Bitrix 24 and if the functionality is available). The course will be available only to group members).
- Through settings during creation:
- hide completely from everyone - hide in the catalog,
- make available to specific departments,
- hide from extranet - for Bitrix 24.
If the course is hidden through settings and assigned, those to whom it is assigned will see it through their personal account. All others will still not see it.